How to Use a Grill
Hello!
Welcome to How to Use a Grill 101.
In this course, I will give you a brief overview of grills.
Then we will discuss;
- Things You Need to Use a Grill.
- Grilling Safety.
- Regulating the Heat on Your Grill.
- Cooking on Your Grill.
Overview of Grills
Knowing how to use a grill is fun, not knowing is not fun.
The information here is designed to make grilling fun and easy for you, so let's get started!
Grills are used for cooking food over a live fire.
It harkens back to when we huddled around a fire and cooked what we hunted and gathered that day.
It fun, tasty, and a little primitive. That may be why guys like it so much.
And some women too, especially the really cool ones.
The heat below the food comes from burning gas, charcoal, or wood.
We're not going to talk about electric grills, because they're not really grills. (No fire)
Because the food is close to the heat source on most grills, grilling is a high heat cooking method.
This means most foods cooked on a grill are cooked in a short time.
Unless you set your grill up in specific ways or use special devices, it's hard to cook low and slow with a grill. It can be done, though.
If you want to cook low and slow, you may want to consider a dedicated smoker for that job.
For more on smokers, check out my smokers' page.
Things You Need
There are some items you need to use your grill. That's part of knowing how to use a grill.
First, you need a grill.
If you don't have one, read this Consumer Awareness Guide about How to Buy a Grill before spending any of your hard-earned cash.
To cook in your grill, you need some fuel. If you have a gas grill, you need propane unless your grill is plumbed directly to your house's natural gas.
For a charcoal grill, of course, you need charcoal.
If you're using charcoal, you need a way to light it.
One of my favorite ways is with a torch.
 Bernzomatic TS4000 High Heat Torch
You light the pile of coals in a few places, and that's it. I also use it to light my offset smoker.
If you're going to get a torch, make sure you get one that has a pressure regulator like the Bernzomatic TS4000. Torches without a pressure regulator will go out when you point them down.
Using a torch does take a little longer than my other preferred method, a chimney starter. But it's fun!
 Weber RapidFire Chimney Starter
I like the chimney starter because it lights the coals evenly and quickly.
It's also an excellent way to measure your charcoal. I'll show you how later on in this class.
There are a few issues with a chimney starter.
They only hold about 100 briquettes. If you have a large grill, this may not be enough.
In this case, you can buy two.
For a standard 22" kettle grill, 100 briquettes are enough.
The chimneys also get hot.
My remedy for this is leather welders' gloves. They work great! You can dump your coals, pick up a hot grill grate, even moves hot logs around.
You can also use potholders and oven mitts to hold the chimney while you dump the hot coals out.
To use a chimney starter, fill up the starter with the desired amount of charcoal. Place a few pieces of crumpled newspaper under the starter and light. After 20-30 minutes, the coals will have white ash all over, indicating that they're ready.
Dump the coals out carefully. They're hot!
Barbecue Tip: Use a garden hoe or a charcoal rake like this one from Weber to arrange your coals.
My favorite chimney starter is the Weber 7429 RapidFire Chimney Starter; it holds more coals than most, works excellent, and is built to last.
Don't have any newspaper? I know me either.
That's why I use these fire starter cubes. They work great and are easy to use. They always light quickly, no matter what. They're non-toxic and odorless. They're also safer than paper because no hot ashes are blowing around.
If you want a smoky flavor to your food, you want some wood chips, chunks, or pellets. They give the food you grill a nice smoky flavor. Don't use too much. A little goes a long way. A handful of chips or pellets or a wood chunk will usually be all you need for fast grilling.
For a charcoal grill, just toss a handful of chips or pellets right on the hot coals. To use a wood chunk, place the piece on top of the hot coals.
Chips and pellets light quickly, and they smoke for a short amount of time. Chunks take longer to light, but they last longer.
For a gas grill, place a wood chunk right on the heat plate or lava rocks above a lit burner.
To use wood chips in a gas grill, fold a piece of heavy-duty aluminum foil in half, so it's double thick. Place your wood chips onto the foil. Fold the foil over, then fold the edges closed to make a packet. Poke some holes into the package to allow smoke to escape. Place the pack over a lit burner in your gas grill.
Don't cram the chips together tightly when folding the packet; you need some air in there so the chips will burn.
If you don't want to make a smoke packet, you can buy a smoker box. They make them for wood chips and pellets.
Here's some information that will have you knowing how to use a grill better than most folks.
You do not need to soak wood chips or chunks before using them.
All this does is delay your smoke output; you don't get smoke until the water steams away from your wet wood.
If you soak smoker pellets, they'll dissolve into sawdust. Store these, so they stay dry.
Grilling Safety
A vital aspect of knowing how to use a grill is knowing how to use a grill safely.
Between 2014-2018, grills, hibachis, and barbecues were involved in an average of 10,600 home fires per year.
These fires caused 10 deaths a year, 160 injuries, and 149 million dollars in property damage!
This is according to a report by NFPA.org. The National Fire Protection Agency.
So, let's go over some safe grilling practices.
Knowing how to use a grill means knowing where to put it.
Never place your grill on a flammable surface like a wooden deck, a dead lawn, a driveway covered in oil, etc.
Embers from a charcoal grill or grease from a gas grill can cause a fire.
Do not cook with live fire on a balcony. Embers can blow around and catch things below you on fire.
Also, place your grill at least 10 feet away from any combustible structure. This means your house, tool shed, etc.
If you use a gas grill and smell propane, turn the gas off and check for leaks. You can do this by spraying soapy water on the lines and connections. The soap will bubble where there is a leak. Replace any leaking parts before grilling.
How to light a gas grill;
- Lift the lid.
- Turn on the gas at the tank.
- Turn on your primary burner and push the ignitor. If the ignitor isn't working, use a long match or a wooden skewer to light the grill.
- Light any other burners that you want to use.
If your grill won't light after several tries, turn off the gas and let the grill air out for several minutes. Turn the gas on and try to relight it. If the ignitor isn't working, use a long match or wooden skewer to light the grill.
If your grill was lit but shut off when you checked it, do not relight it immediately! Propane that may have built up in the grill may explode.
First, see if there's fuel in the tank. If there is, lift the lid and let the grill air out for several minutes. Turn the gas on and try to relight it. If the ignitor isn't working, use a long match or wooden skewer to light the grill.
Regulating the Heat on Your Grill
A crucial part of knowing how to use a grill is knowing how to regulate your grill's heat.
If the fire is too hot for what you're cooking, the food will burn. If the fire is not hot enough, the food will not brown nicely and will take too long to cook.
On a gas grill, controlling the heat is easy; just turn the knobs.
On a charcoal grill, it's a little more complicated than that.
Heat is controlled in a charcoal grill in two ways:
- Regulating airflow with dampers.
- Controlling heat output with fuel.
Charcoal grills have dampers.
Usually, 1 or 2 at the bottom and 1 or 2 at the top, depending on your model. Weber kettle grills have one damper at the bottom and one on top.
Closing these dampers restricts oxygen, causing the fuel to burn less efficiently. This causes the temperature to drop.
In most cases, you want to leave the bottom damper fully open. Use the top damper to regulate the temperature by closing the damper to reduce airflow or opening the damper to increase airflow.
Do not close the top damper(s) all the way, or the fire will go out.
The second way to regulate heat in a charcoal grill is by using more or less fuel.
This is an essential part of knowing how to use a grill; It's best to use more charcoal than less. Then use the damper(s) to control the temperature.
It's much easier to cool down a fire with a lot of charcoal than trying to make a raging fire with only a few coals.
How much charcoal do you need?
I made a handy guide for you below.
This is for a 22" Weber Kettle grill (the most common size) using standard-sized briquettes. Both dampers are wide open.
You can measure the charcoal with your chimney starter or count the briquettes out. The numbers don't have to exact; just get them close.
- For high heat - 450°F-550°F or hotter, use a full chimney, about 100 briquettes.
- For medium heat -350°F-450°F, use 1/2 to 3/4 full chimney, about 50-75 briquettes.
- For low heat - 250°F-350°F, use a 1/4 full chimney, about 25 briquettes.
Add 16 briquettes every hour to maintain the heat.
How to Use a Grill to Cook Food
This is the best part of knowing how to use a grill; the cooking!
There are basically two methods used when cooking on a grill; direct heat and indirect heat.
Knowing how to use a grill requires mastery of both these methods.
Direct heat cooking means placing your food directly above the fire. To cook with direct heat in a charcoal grill:
- Light the appropriate amount of charcoal for what you're cooking.
- When the coals are ready, lay them on the charcoal grate in a single layer for a moderate heat level.
- For more intense heat, arrange the coals in a double layer. This gives you more briquettes for heat and puts them closer to the food.
- Let you grill heat up for 10 minutes.
- Clean your grate and cook your food.
Arranging the coals close together will give you more intense heat. Leaving a little space between the briquettes will provide you with less extreme heat.
Leave a little space without coals, a safety zone. You can move foods to your safety zone in case of flare-ups.
You don't want to use your lid to put out these flare-ups because putting your lid down when you have a grease fire causes black sooty tasting smoke to flavor your food. Not good.
To cook using direct heat in a gas grill:
- Lift the lid to your grill.
- Turn on the gas at the source.
- Turn on your main burner and push the ignitor.
- Turn all burners on high for 10 minutes to heat up your grill.
- Turn the burners you'll be using to the proper level for the food you're cooking.
- Clean the grate and cook your food.
Gas grills don't really need a safe zone, because you can always turn the burners off if you have a flare-up.
When I cooked in restaurants on a gas grill, I kept one burner on low. This was my safe zone. I also put foods there that were almost ready to plate.
To cook with indirect heat on a gas grill:
- Lift the lid to your grill.
- Turn on the gas at the source.
- Turn on your main burner and push the ignitor.
- Turn all burners on high for 10 minutes to heat up your grill.
- Turn your center burner(s) off. Use your primary burner(s) for cooking your food.
- Clean the grate and cook your food.
For example, I have a Weber Genesis gas grill. It has three burners. When I cook indirect on it, I only use the rear burner. It's on medium-high to high, depending on what I'm cooking. I only use the back burner because it gives me more room to cook my food.
You can also turn both outer burners to medium and place your food in the middle. This is the method that I use when I cook food on my rotisserie.
To cook with indirect heat on a charcoal grill:
- Light the appropriate amount of charcoal for what you're cooking.
- When the coals are ready, pile them on one side of the charcoal grate.
- Put a drip pan next to the coals.
- Let your grill heat up for 10 minutes.
- Clean your grate and cook your food.
You can use one large drip pan or two smaller ones. See the picture below for reference.
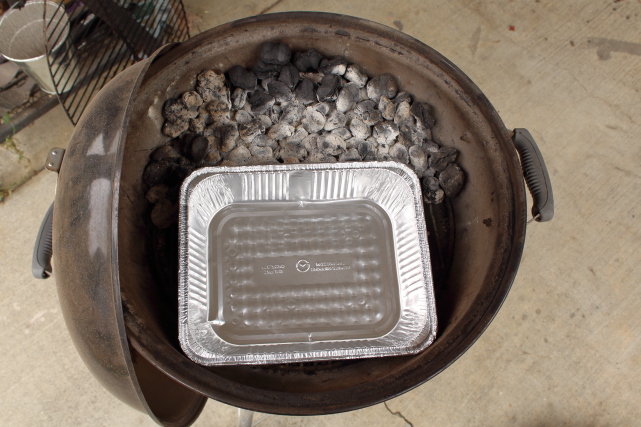
Be careful when lifting this drip pan when it's hot. The bottom is a little flimsy. If you want the liquid, consider removing most of it with a cup before lifting the hot pan.
Some people will tell you, and even the Weber manual says to put the coals on both sides of the grill grate and put your drip pan in the middle.
I did this for years. Unfortunately, there are some problems with this.
- You have less room for cooking.
- It's hard to save the drippings because the charcoal is so close, it dries all the liquid up.
- Ashes fall into the drip pan. That's ok if you don't want to use the drippings; it sucks if you do.
How do you know which method to use? Here's a good rule of thumb;
- Use the direct heat cooking method for foods that take less than 25 minutes to cook.
- Use the indirect heat cooking method for foods that take more than 25 minutes to cook.
Here are a couple more items about knowing how to use a grill;
- Foods that cook quickly need more intense heat. For instance, take shrimp. Shrimp cooks in a few minutes; to cook something this fast and make it taste good, you need extreme heat. If you cook it with low heat, it will not brown before it's done. If you continue to cook it until it browns at low heat, it will be stringy and chewy.
- You should use a lid most of the time when cooking on your grill. The cover helps retain and regulate heat. The only time you want to cook without a lid is if you want a really intense sear. Cooking without the top in this situation ensures that you get extreme heat only from the bottom, giving you a nice crust.
Now you know the basics of how to use a grill. The only way to improve your skills is by experience.
So, get out there and grill up something delicious!
I hope you've enjoyed this class on How to Use a Grill.
If you have any questions or comments about this page, please use the form below or contact me here.
Have A Question or Comment About This Topic?
Do you have a question or comment about this? Share it!
Write your comments about this page in the box below.
Some of the links on Barbecue-Know-How.com are affiliate links, which means that I will earn a commission if you choose to purchase. This commission comes at no additional cost to you. Please understand that I have experience with all these companies. I recommend them because they are helpful and useful, not because of the small commissions I make if you decide to buy something. Please do not spend any money on these products unless you feel you need them or that they'll help you achieve your goals. If you need any help or have any questions about this, please contact me here.
Recent Articles
-
Heat control
Jul 14, 24 03:05 PM
I have an Assassin Smoker; I've had it for years. I use a Barbecue Guru. I have tried everything but cannot get my temperature under 400°; I even changed -
Brining pre-brined wings
Feb 12, 24 09:48 PM
 First-time smoker here. I bought wings to smoke for gameday, and the package says, Contains up to 8% solution of water and Kosher salt. Does that mean
 -
20lb Meat Mixer Used to Shred Pork Butts
Oct 18, 23 10:50 PM
Do you know if a 20lb meat mixer like the ones used to mix ground meat with seasoning could be used successfully to shred a pork butt? I have several
We are a participant in the Amazon Services LLC Associates Program, an affiliate advertising program designed to provide a means for us to earn fees by linking to Amazon.com and affiliated sites.