Barbecue Turkey

Barbecue turkey has been a classic around my house for years.
Thanksgiving, Christmas or any other time of the year, this is the way I do it.
I think it's by far the best method.
When you cook a turkey on your smoker, you get a flavor you just can't get any other way.
Cooked this way, the flesh is incredibly moist. Tender but firm, not mushy. And you can't beat the smoky flavor.
How My Love for Barbecue Turkey Began
One day, many moons ago...
I was at my in-law's house admiring my Father-in-laws Weber kettle grill. I had just gotten out of the Army and hadn't done much cooking for myself yet. (I was spoiled; my Mother is a great cook and made all our meals when I was a child)
This grill was nice; it was black, looked sleek, heat and smoke were radiating from inside. I told my Father-in-law "I love you grill!" Next thing I know, he bought one for me! Wow, was I a happy camper! Thanks Dad!
Inside was a recipe book, and in that book was a recipe for cooking a turkey on your grill. I couldn't believe it!
I got right to work...
Now that barbecue turkey was really good. I added wood chunks to give it some smoke flavor, but it lacked a little bit of the smokiness you get from smoked turkey.
I also found it difficult to collect the juices from the bird as it cooked; Sometimes it can be difficult to fit a turkey, on a rack, in a roasting pan, inside a kettle grill.
If I put the pan under the grate, most of the juices would dry up. What was left had charcoal and ashes in it.
Eventually I graduated up to a barbecue pit. I think this gives your barbecue turkey the perfect amount of smoke while keeping it moist, tender and delicious.
Barbecue Turkey Method
When you barbecue a turkey, or most kinds of poultry, you cook it at a higher temperature. It's slow roasting on your barbecue pit. That's because the temperature is higher than most traditional barbecue. The temperature you want to use to barbecue turkey is 300°F to 325°F, and there's several advantages to cooking it at this temperature:
- This gets the bird out of the "food safety danger zone" quicker.
- It helps to crisp the skin and give it good "bite through".
- The turkey cooks slow enough to keep it moist.
One more thing; when you cook a turkey outdoors, it frees up oven space for those tasty side dishes!
What to Look for When Buying a Turkey
Here are some tips for selecting the perfect turkey for your holiday feast.
- Buy a turkey that is fresh and not frozen. Fresh is always better than frozen. When things are frozen, the ice crystals that form can rupture cell walls. This gives food a softer, sometimes mushy quality.
- Get a turkey that is natural; one that has not been injected or enhanced.
- Size is important; you need about 1 pound per person. 1 1/2 pounds is better, then you'll have some leftovers.
- Buy the smallest turkey that you need. Smaller turkeys cook faster and the meat is more tender.
Now I realize that not you may not be able to easily find a turkey that's fresh and natural, especially during certain times of the year, or if you live in a small rural area. Here's some help for you, it's okay. Just find the best turkey you can.
If you buy a frozen bird, remember; it takes 1 day to defrost 4 pounds of turkey in your fridge. You should put a frozen turkey into the fridge a week before you cook it. This gives you enough time to defrost and brine the bird.
Very Important Safety Tip: Always defrost meat, fish and poultry in your refrigerator. Never at room temperature! If you defrost a turkey on your kitchen counter, the surface and cavity will be teaming with bacteria by the time the center is defrosted.
If you cannot find a turkey that is not self-basting, injected or otherwise enhanced, read the label.
- If you don't know what an ingredient is, you probably shouldn't eat it.
- Modified food starch and Sodium phosphates are things you want to avoid.
- Also notice the amount. The label will give you a percentage. The higher the percentage, the more water you're paying for.
Kosher turkeys are also a good alternative. They're minimally processed. They are salted, so they shouldn't be brined. Kosher birds can be a little salty. If you're sensitive to salt, avoid these.
I really encourage you to find a fresh turkey that has not been injected or enhanced. Our barbecue turkey recipe calls for brining your bird to bring out the best flavor and texture. And it's well worth it!
Barbecue Turkey Setup
Before I give you the recipe, I think it's important to see how the cooker is set up.
This is very specific because of the kind of smoker I use. Even if you don't have a large vertical, or upright smoker, you'll be able to understand what you're trying to accomplish.
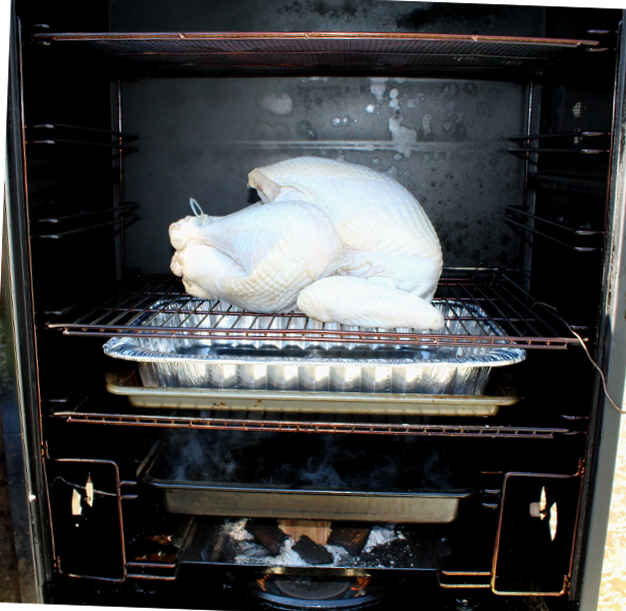
As you can see, the turkey is on one rack. Below that is a drip pan supported by a baking sheet.
Very Important Safety Tip! If you use a disposable roasting pan, always put a cookie sheet beneath it. If you have a lot of juices or whatever in the pan, it will give out... Getting a nasty burn before the holiday feast is not what you want!
Disposable drip pans are great because you don't have to clean up! A pan from your kitchen has to be cleaned. All the smoke and grease can make it a chore. And if you muck up the wife's nice roasting pan, you might end up in the dog house!
Underneath the drip pan is the water pan. Then the smoke plate and finally the burner.
This setup works great because you can catch the turkey juices to make a fantastic gravy. The turkey is not in a pan so it doesn't get soggy and the smoke can surround the entire bird.
This is what it looks like when it's done...

Now if you don't have a large vertical smoker, you can still do this in an offset smoker.
Just remember a few things;
- Put your turkey on the cooking grate. Place your drip pan beneath it.
- Place the turkey and the drip tray as far from the fire box as possible. This keeps ashes from getting into your drippings. It also helps to keep the juices in the drip pan from drying out.
- A heat baffle, if installed, will help to keep the ashes out. If you don't have a heat baffle, you should install one. It helps to even out the temperature in your cooker.
- Don't use a water pan. The water pan will keep the temperature down and will prevent the skin from crisping up nicely
- If you have a counter flow smoker, you obviously can't put the drip pan under the grate. Use a roasting rack and place the rack and turkey in a roasting pan.
Barbecue Turkey Recipe
Note: If you purchased a kosher turkey or one that has been brined or injected, skip the brining procedure.
You'll need a container to brine the turkey in. Food grade buckets work great. They can be found at Lowes for a good price. Make sure you get a lid. Restaurants and bakeries receive food in buckets. You may be able to get a bucket for free just by asking. Wash the bucket out thoroughly before use.
Never use a bucket that contained some kind of chemical; paint, cleaners, etc...
Because of food safety concerns, I don't advise stuffing your turkey. Cook the stuffing in a separate dish.
Cook the turkey in your smoker at 300°F-325°F. Use apple, cherry or maple wood. If your smoker has a water pan, leave it in place but do not put any liquid in it.
- 1 fresh turkey that has not been injected, brined or salted
- 1 turkey brine recipe
- Make the brine recipe. Cool the brine completely.
- Remove the neck and giblets from the turkey. Place the turkey in a pot, food grade bucket or small ice chest that's large enough to hold the turkey and the brine, but small enough to fit in your refrigerator. You may have to remove some shelves to make your container fit.
- Pour the brine into the container. Make sure the turkey is completely submerged. If you're using a bucket you can put a plate on top on the turkey to keep it submerged. (If the turkey is not completely submerged, you can brine it for 6-12 hours and then turn it over and brine for another 6-12 hours). Cover the container and brine the turkey for 12-24 hours.
- Light your smoker and bring the temperature to 300°F-325°F. Meanwhile, remove the turkey from the brine and rinse thoroughly with cold water. Dry completely. Position your turkey breast side down on a cutting board. Tuck the wings. This keeps them from burning and stabilizes the bird. See the instructions below.
 Point the wing tip forward Point the wing tip forward |
 Lift the wing tip up Lift the wing tip up |
 Push the wing tip over and behind the shoulder joint Push the wing tip over and behind the shoulder joint |
 This is what it looks like when you're done This is what it looks like when you're done |
Next...
- Add your wood. (Use wood chunks or chips for half of the cooking time.) Place the turkey on your barbecue.
- Cook for 18-20 minutes per pound at 300°F-325°F, until the internal temperature reaches 165°F. Use an instant read thermometer to take the temperature at the thickest part of the breast and the thickest part of the thigh.
- When your barbecue turkey is done, remove it from the smoker and tent with foil. Let rest for 15-20 minutes. Carve and serve.

Recipe Talk.
Be a Barbecue Know-Hower!
Do you have a question or comment about this recipe? Enter it below.
Have you've tried this recipe? Give us your review on it.
You'll be helping everyone who reads this page. And who knows, you may become famous!
Write your comments about this page in the box below.
Some of the links on Barbecue-Know-How.com are affiliate links, which means that I will earn a commission if you choose to purchase. This commission comes at no additional cost to you. Please understand that I have experience with all these companies. I recommend them because they are helpful and useful, not because of the small commissions I make if you decide to buy something. Please do not spend any money on these products unless you feel you need them or that they'll help you achieve your goals. If you need any help or have any questions about this, please contact me here.
Recent Articles
-
Heat control
Jul 14, 24 03:05 PM
I have an Assassin Smoker; I've had it for years. I use a Barbecue Guru. I have tried everything but cannot get my temperature under 400°; I even changed -
Brining pre-brined wings
Feb 12, 24 09:48 PM
 First-time smoker here. I bought wings to smoke for gameday, and the package says, Contains up to 8% solution of water and Kosher salt. Does that mean
 -
20lb Meat Mixer Used to Shred Pork Butts
Oct 18, 23 10:50 PM
Do you know if a 20lb meat mixer like the ones used to mix ground meat with seasoning could be used successfully to shred a pork butt? I have several
We are a participant in the Amazon Services LLC Associates Program, an affiliate advertising program designed to provide a means for us to earn fees by linking to Amazon.com and affiliated sites.